前言
手撕轮播图,前端人必备技能,Swiper.js 是目前使用最为广泛的轮播图插件,今天就仿照其实现一个 Swiper 组件
项目地址:GitHub
在线演示:CodeSandBox
正文
滚动原理
轮播图的原理很简单,就是固定一个外层容器 instance,然后将需要滚动的元素 item 横向包裹在容器 container 中,放入 instance 中,并使用绝对定位和 left 属性控制其在 instance 视窗中的位置
当然,一个典型的轮播图还需要左右切换按钮和分页按钮,那么很轻松地,我们就可以写出如下的 HTML 结构:
 1
 2
 3
 4
 5
 6
 7
 8
 9
10
11
12
13
| <div id="swiper-instance" class="swiper">
<ul class="swiper-container">
<!-- 只需要在这里添加平行元素可以 -->
<li class="swiper-item">1</li>
<li class="swiper-item">2</li>
<li class="swiper-item">3</li>
<li class="swiper-item">4</li>
</ul>
<!-- 控制模块 -->
<button class="swiper-button prev"><</button>
<button class="swiper-button next">></button>
<div class="swiper-dots-group"></div>
</div>
|
我们再为其添加样式,给最外层的容器设置 overflow-hidden,使其只显示视窗范围内的元素,并且给内层列表容器设置相对定位,这样我们就可以使用 left 去控制其位置,CSS 参考如下:
 1
 2
 3
 4
 5
 6
 7
 8
 9
10
11
12
13
14
15
16
17
18
19
20
21
22
23
24
25
26
27
28
29
30
31
32
33
34
35
36
37
38
39
40
41
42
43
44
45
46
47
48
49
50
51
52
53
54
55
56
57
58
59
60
61
62
63
64
65
66
67
68
69
70
71
72
73
74
75
76
77
78
| /* 最外层容器 */
.swiper {
margin: 0 auto;
overflow: hidden; /* 只显示视窗范围内的元素 */
width: 0; /* js 设置 */
height: 0; /* js 设置 */
position: relative;
}
/* 包裹 slide 的列表 */
.swiper .swiper-container {
cursor: pointer;
margin: 0;
padding: 0;
list-style: none;
position: relative;
display: flex;
transition: left 0.5s;
/* 以下为滑动相关逻辑 */
width: 0; /* js 设置,值为 slideCount * 100% */
left: 0; /* js 设置,值为 -currentSlideIdx * width */
}
/* slide 所在的 item 元素 */
.swiper .swiper-container .swiper-item {
background-color: rgb(138, 185, 226);
border: 1px solid #fecccc;
width: 0; /* js 设置 */
height: 0; /* js 设置 */
display: flex;
justify-content: center;
align-items: center;
}
/* 左右切换按钮 */
.swiper-button {
position: absolute;
top: 50%;
transform: translateY(-50%);
width: 30px;
height: 30px;
background-color: rgba(0, 0, 0, 0.5);
color: #fff;
display: flex;
justify-content: center;
align-items: center;
cursor: pointer;
}
.swiper-button.prev {
left: 0;
}
.swiper-button.next {
right: 0;
}
/* 分页按钮 */
.swiper-dots-group {
position: absolute;
bottom: 10px;
left: 50%;
transform: translateX(-50%);
display: flex;
justify-content: center;
align-items: center;
}
.swiper-dot {
width: 15px;
height: 5px;
border-radius: 3px;
background-color: rgba(0, 0, 0, 0.5);
margin: 0 5px;
cursor: pointer;
transition: width 0.5s;
}
.swiper-dot.active {
background-color: #fff;
width: 20px;
}
|
这样,如果我们设置轮播图的宽度为 600px,高度为 400px,总共有 4 个滚动元素(item),那么最外层容器和最内层 item 元素的宽高也需要设置成 600px 和 400px,而内层列表容器总宽度则是 4 * 400px = 1600px。这样,我们通过给列表容器设置 left 属性就可以实现横向移动,如 left = -600px 时显示的就是第二个 item,left = -1200px 时显示的就是第三个 item。这里我们需要使用 JavaScript 来实现,为了更清晰的表达类型,我采用了 TypeScript 来展示
由于这里的 Swiper 不只是可以轮播图片,而可以轮播其内部的任意 html 元素,从而实现类似幻灯片切换的效果,所以我们可以将不同的页面称为一个 slide
那么,我们需要实现一个 Slider 类,它大致有如下结构:
 1
 2
 3
 4
 5
 6
 7
 8
 9
10
11
12
13
14
15
16
17
18
19
20
21
22
23
24
25
26
27
28
29
30
31
32
33
34
35
36
37
38
39
40
41
42
43
44
45
| // 传入参数
interface ISlideConfig {
width?: number;
height?: number;
unit?: "px" | "em" | "rem";
defaultSlideIndex?: number;
autoPlay?: boolean;
autoPlayTimeout?: number;
clickWaitTime?: number;
}
// Slider 的状态
interface ISlideState extends Required<ISlideConfig> {
curSlideIndex: number;
slideCount: number;
}
class Slider {
public root: string;
public container: HTMLElement;
public wrapper: HTMLElement;
public dotGroup: HTMLElement;
public prevButton: HTMLElement;
public nextButton: HTMLElement;
private state: ISlideState;
constructor(root: string, config: ISlideConfig) {
this.root = root;
this.container = document.querySelector(root);
this.wrapper = document.querySelector(`${root} .swiper-container`)!;
this.dotGroup = document.querySelector(`${root} .swiper-dots-group`)!;
this.prevButton = document.querySelector(`${root} .swiper-button.prev`)!;
this.nextButton = document.querySelector(`${root} .swiper-button.next`)!;
// 内部状态
this.state = {};
this.init();
}
private init() {}
/* --------- External API --------- */
public slideTo(index: number) {}
public slideNext() {}
public startPlay() {}
public stopPlay() {}
}
|
新建实例时可以传入许多参数,例如设置宽高和自动播放等,并且我们将这些参数合并到 state 变量中,以记录 Slider 的状态,我们先实现页面的切换
切换页面
首先我们需要设置元素的宽高,在类的构造函数内,我们获取到传入的宽高、单位、slide 数量等
 1
 2
 3
 4
 5
 6
 7
 8
 9
10
11
| this.state = {
width:
config.width ??
(this.container.parentNode as HTMLElement).offsetWidth ??
600,
height: config.height ?? 300,
unit: config.unit ?? "px",
defaultSlideIndex: config.defaultSlideIndex ?? 0,
curSlideIndex: config.defaultSlideIndex ?? 0,
slideCount: this.wrapper?.children.length ?? 0,
};
|
随后我们可以添加一个 init 函数,用于初始化元素的宽高:
 1
 2
 3
 4
 5
 6
 7
 8
 9
10
11
12
13
| private init() {
this.container.style.width = this.state.width + this.state.unit;
this.container.style.height = this.state.height + this.state.unit;
this.wrapper.style.width = this.state.slideCount * 100 + "%";
this.wrapper.style.left = `-${this.state.curSlideIndex * 100}%`;
for (let i = 0; i < this.wrapper.children.length; i++) {
// 设置每个 slide 的宽高
(this.wrapper.children[i] as HTMLElement).style.width =
this.state.width + this.state.unit;
(this.wrapper.children[i] as HTMLElement).style.height =
this.state.height + this.state.unit;
}
}
|
随后我们实现 slideTo 方法:
1
2
3
4
5
6
| public slideTo(index: number) {
if (index < 0 || index >= this.state.slideCount) return false;
this.state.curSlideIndex = index;
this.wrapper.style.left = `-${index * 100}%`;
return true;
}
|
逻辑很简单,判断 index 是否越界,然后设置 wrapper 的 left 属性即可
在此之上封装 slideNext 和 slidePrev 方法:
 1
 2
 3
 4
 5
 6
 7
 8
 9
10
| public slideNext() {
if (this.state.curSlideIndex === this.state.slideCount - 1) {
this.slideTo(0);
} else this.slideTo(this.state.curSlideIndex + 1);
}
public slidePrev() {
if (this.state.curSlideIndex === 0) {
this.slideTo(this.state.slideCount - 1);
} else this.slideTo(this.state.curSlideIndex - 1);
}
|
简单的循环加减,在 init 方法中为两个按钮添加事件监听即可。
随后我们还需要实现一个分页按钮,在 init 方法遍历 children 数组的时候,动态添加,这里需要注意我们为 dot 节点添加了 data-index 自定义属性,这样我们在后续获取节点的时候可以通过选择器 document.querySelector('[data-index="1"]') 来获取节点了:
 1
 2
 3
 4
 5
 6
 7
 8
 9
10
11
12
13
14
15
16
| for (let i = 0; i < this.wrapper.children.length; i++) {
// 设置每个 slide 的宽高
(this.wrapper.children[i] as HTMLElement).style.width =
this.state.width + this.state.unit;
(this.wrapper.children[i] as HTMLElement).style.height =
this.state.height + this.state.unit;
// 添加按钮
const dot = document.createElement("button");
dot.setAttribute("data-index", String(i));
dot.classList.add("swiper-dot");
if (this.state.curSlideIndex === i) dot.classList.add("active");
dot.addEventListener("click", () => {
this.slideTo(i);
});
this.dotGroup.appendChild(dot);
}
|
这里的 dot 有一个 active 状态,需要在 slideTo 方法执行时也动态改变
 1
 2
 3
 4
 5
 6
 7
 8
 9
10
11
12
13
14
15
16
| public slideTo(index: number) {
if (index < 0 || index >= this.state.slideCount) return false;
// 获取到原先 active 的 dot 节点,将其移除 active 状态
document
.querySelector(
`${this.root} .swiper-dots-group [data-index="${this.state.curSlideIndex}"]`
)!
.classList.remove("active");
// 找到下一个 active 的 dot 节点,为其添加 active 状态
document
.querySelector(`${this.root} .swiper-dots-group [data-index="${index}"]`)!
.classList.add("active");
this.state.curSlideIndex = index;
this.wrapper.style.left = `-${index * 100}%`;
return true;
}
|
好了到这里我们的轮播图已经可以正常使用了,接下来我们需要为其实现拖拽滚动效果
拖拽滚动
想要实现拖拽,我们需要用到三个事件:mousedown、mousemove 和 mouseup,整个逻辑大致如下:
一、鼠标按下时
- 将拖拽标识
isMouseDown 设置为 true - 将当前位置 x 坐标记录在
startX 变量内 - 将
wrapper 的 transition 属性设置为 none
对应代码如下:
1
2
3
4
5
6
| private onMouseDown(e: MouseEvent) {
this.stopPlay();
this.state.isMouseDown = true;
this.state.startX = e.pageX;
this.wrapper.style.transition = "none";
}
|
二、鼠标移动时
- 若拖拽标识
isMouseDown 为 true,执行拖拽逻辑 - 检查当前鼠标位置横坐标与上一个未知横坐标
startX 之间的差值,如差值为正说明往右拖动,为负则说明往左拖动,将差值与容器的 left 值相加得到更新后的值 - 检查新的值是否越界(拖到边缘),越界了则将其设为边界值
- 如果没有越界,则将容器的
left 属性设置为更新后的值
对应代码如下:
 1
 2
 3
 4
 5
 6
 7
 8
 9
10
11
12
| private onMouseMove(e: MouseEvent) {
if (!this.state.isMouseDown) return;
let left = this.wrapper.offsetLeft;
const edge = [0, -((this.state.slideCount - 1) * this.state.width)];
left += e.pageX - this.state.startX;
// 检查是否越界
if (left >= edge[0]) left = 0;
if (left <= edge[1]) left = edge[1];
// 没越界,更新
this.state.startX = e.pageX;
this.wrapper.style.left = left + this.state.unit;
}
|
三、鼠标松开时
- 将拖拽标识
isMouseDown 设置为 false - 计算当前拖动到的位置,找到与之最近的
slide,并执行 slideTo 方法
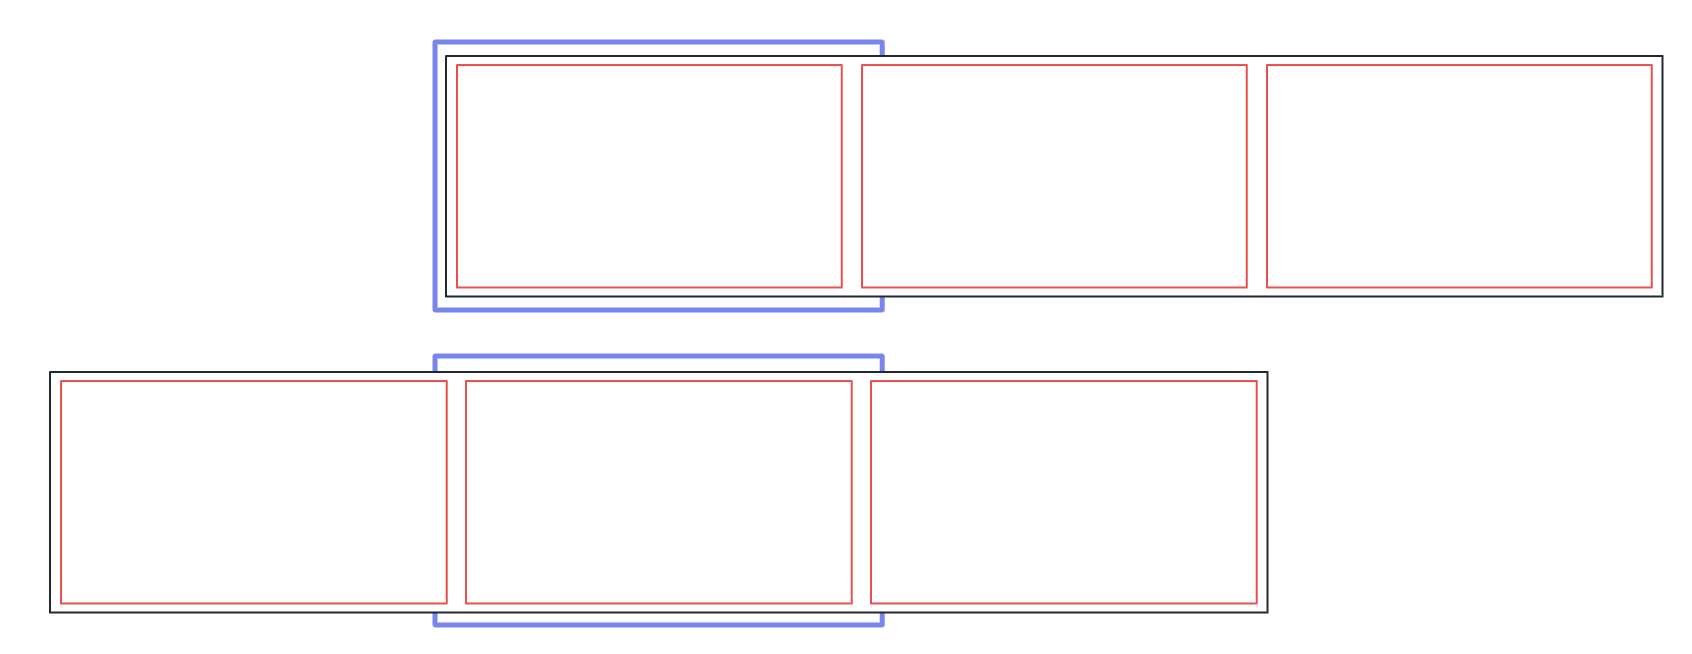
这里的判断逻辑很简单,wrapper.offsetLeft 是一个负值,以宽度 600 为例,当容器的 offsetLeft 如下时,对应元素刚好位于视窗中心
| index | offsetLeft |
|---|
0 | 0 |
1 | -600 |
2 | -1200 |
3 | -1800 |
如果我们从 offset=0 开始向左拖动元素,很显然一个分界点是元素的右边界到达视窗中心位置,如图所示,此时的 offsetLeft 为 -300:
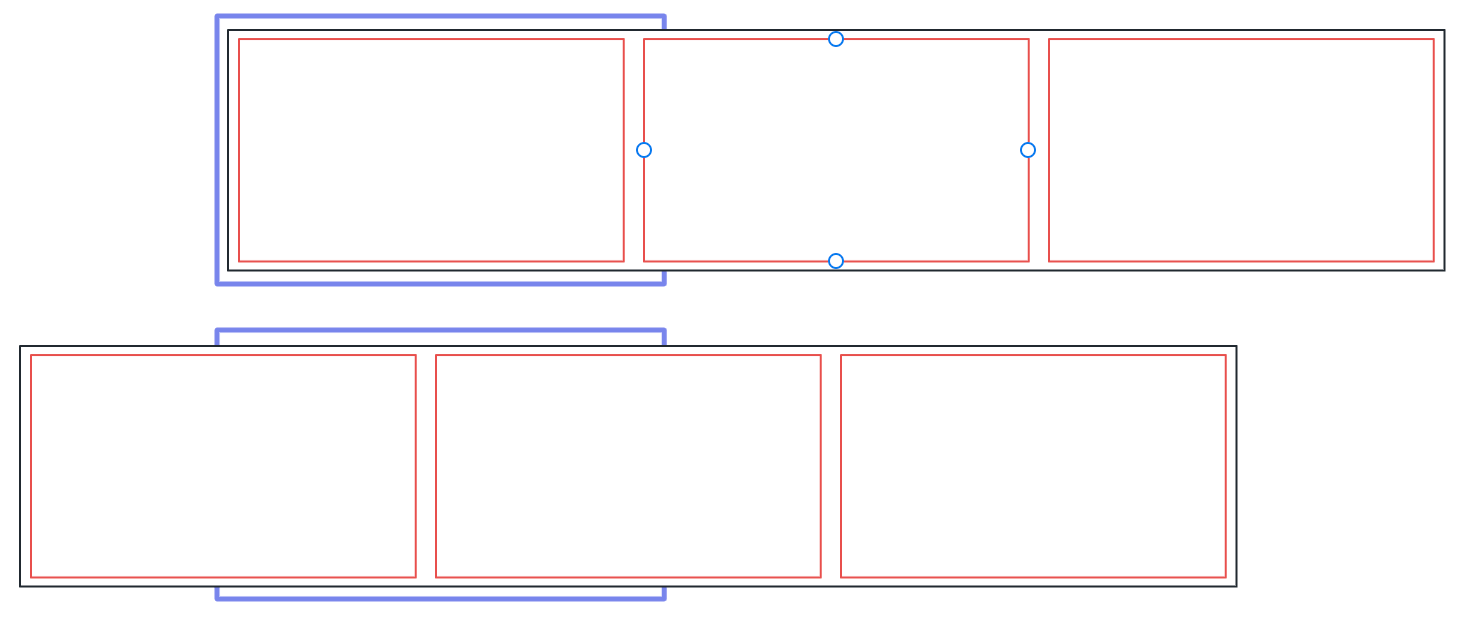
很显然,当拖动的位移超过元素宽度的一半时,就该到下一个元素了,通过这种逻辑,我们可以列举元素的范围,实际上就是容器 offsetLeft 左右一半宽度的这个范围,如下表,首尾由于边界限制只能取一半
| index | offsetLeft | range |
|---|
0 | 0 | 0 - -300 |
1 | -600 | -300 - -900 |
2 | -1200 | -900 - -1500 |
3 | -1800 | -1500 - -1800 |
那么只需要对容器 offsetLeft 判断在哪个范围内,然后将其滚动到对应序号的元素即可,这里可以先将其减去元素宽度的一半,然后再整除元素宽度,例如某时刻容器 offsetLeft 值为 -700,属于第二个元素,做 (-700 - 300) / 600 得到 -1,随后执行 slideTo(1) 即可,对应代码如下,这里先将负值转为正值计算:
1
2
3
4
5
6
7
8
| private onMouseUp() {
if (!this.state.isMouseDown) return;
this.state.isMouseDown = false;
const leftRef = -this.wrapper.offsetLeft + (1 / 2) * this.state.width;
const index = Math.floor(leftRef / this.state.width);
this.wrapper.style.transition = "left 0.5s";
this.slideTo(index);
}
|
这样我们就实现了拖拽滚动
自动轮播
自动轮播效果需要考虑许多情况,首先需要一个 startPlay 方法
1
2
3
4
5
6
| public startPlay() {
this.state.isPlaying = true;
this.state.autoPlayInterval = setInterval(() => {
this.slideNext();
}, this.state.autoPlayTimeout);
}
|
将 state 中的 isPlaying 状态更新为 true,然后设置定时器定时切换下一张即可。
但如果只有这样的话,交互的点击和拖拽会与自动轮播发生冲突,那么我们需要给对应的元素修改事件监听,如果点击的时候正在自动轮播,则需要停止轮播,等到完成切换之后再重启放映,
 1
 2
 3
 4
 5
 6
 7
 8
 9
10
11
12
13
14
15
16
17
18
19
| // 左右切换按钮,右按钮同理
this.prevButton?.addEventListener("click", () => {
this.slidePrev();
if (this.state.isPlaying) {
this.stopPlay();
this.restartPlay();
}
});
// 拖拽逻辑
private onMouseDown(e: MouseEvent) {
this.stopPlay();
// ... 其他逻辑
}
private onMouseUp() {
// ... 其他逻辑
if (this.state.autoPlay) this.restartPlay();
}
|
这里的重启放映有几个注意事项,我们希望在点击或拖拽停下一段时间后再执行,这里的逻辑有些类似 防抖 Debounce,因此我们需要维护一个计时器,当触发本事件时检查计时器是否存在,如果已存在,则重置倒计时,等到倒计时结束后再重新放映。代码如下:
1
2
3
4
5
6
7
8
| private restartPlay() {
if (this.state.clickTimeout) {
clearTimeout(this.state.clickTimeout);
}
this.state.clickTimeout = setTimeout(() => {
this.startPlay();
}, this.state.clickWaitTime);
}
|
而停止放映也需要注意,如果当前有定时重启的计时器,也需要把它一同清除,只清除自动放映的定时器的话,等到定时重启的计时器倒计时完成会重新创建定时放映,使得停止放映失败,代码如下:
 1
 2
 3
 4
 5
 6
 7
 8
 9
10
11
| public stopPlay() {
this.state.isPlaying = false;
// 定时重启也需要清除
if (this.state.clickTimeout) {
clearTimeout(this.state.clickTimeout);
}
// 清除定时放映的定时器
if (this.state.autoPlayInterval) {
clearInterval(this.state.autoPlayInterval);
}
}
|
至此,我们已经完成了所有逻辑的实现,完整代码放在 GitHub,你也可以在这里查看在线演示 CodeSandBox